First, enter the four values in the top of the spreadsheet. These values are: the diameter of the round duct, the lengths of the two sides of the square end, and what you want the overall length of the transition to be when it's built (ie, how much space you have to transition between your square duct and round duct).
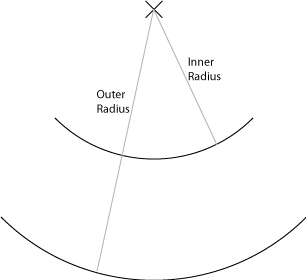
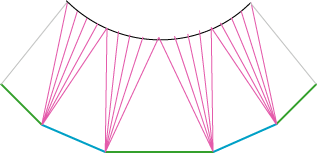
The spreadsheet will provide you with four other values. Two will be the "Inner Radius" and the "Outer Radius". Make two concentric (meaning, the have the same center) arcs of these two radii onto the material you're going to make the duct out of.
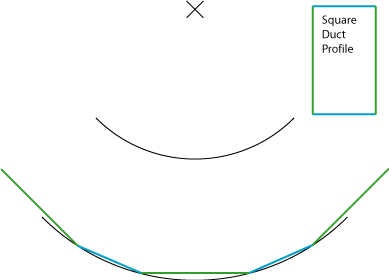
Then, get a straight-edge and draw some lines which begin and end along the outer arc. The length of these lines should be the length of either the short or long sides of your desired square end (remember, two of those values you entered into the spreadsheet?).
The first line should be placed in the center of your arc. It's not terribly important, but it's probably a little easier if this first line is the long length of the square duct. Then, draw a short line from each endpoint of this center line. Then, draw two more long lines from the endpoints of those short ones. (Note: In the drawing, I made the arc too short, but those straight lines would have ended right on the arc). Note that I've color-coded the lines to match the sides of the square duct profile.
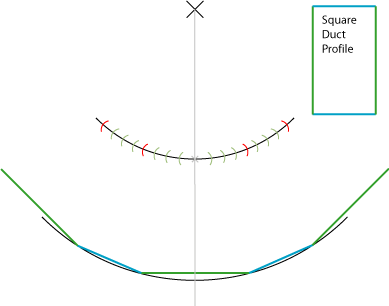
Next, draw a line from the center of the arcs through the middle of the center long line. Make a little mark where this line crosses the inner arc. Then, set your compass to the "Long Tick Distance" from the spreadsheet and make a tick mark along the inner arc on each side from the mark you made. Then, make another set of ticks from where those first ticks cross the inner arc. These four ticks are shown in red in the diagram.
Then, set your compass to the "Short Tick Distance" and make similar ticks like you did with the "Long" ticks, and make these in between the long ticks. These shorter ticks are shown in olive-green color.
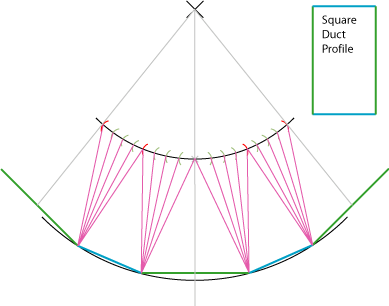
Now, draw lines from the ends of each of the outer-arc straight lines to the tick marks as shown. Notice how the "long" tick marks are where you switch to the next outer-arc point. These lines are shown in purple. These are going to be fold lines.
Lastly, draw two lines from the center of the two arcs through the outermost red tick marks. These lines are shown in grey. These are where you're going to cut.
Then, cut out the shape along the inner curved arc, the outer straight lines, and along those two lines that you drew in the previous step. DO NOT FORGET to leave a little extra on one side of the arc for soldering or riveting the thing into a conical shape. Also, you probably want to leave a little extra sticking out from the inner and outer arcs so that you can easily solder or mate this thing to your ducts.
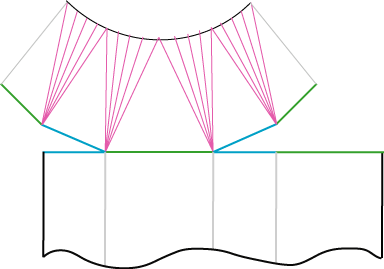
If you haven't made the square duct that this is mating to, you can build it right into the evolution, to some extent. Use the diagram below (and note the colors of the sides) to fashion a square duct with one side already connected. Again, leave a little extra material for soldering.
Also note that the wavy line at the bottom means that you can make this section as long as you want the square duct to be.